

Internet connectivity has become one of the essential entities in the current advanced digital world.
Everyone wishes to have an internet connection with pretty much high-speed.
How to Create Moments on Twitter and get more Followers
I have come up with a simple solution that is to have wireless hosted network.
In fact, the concept of the wireless hosted network was created in Windows 7 operating system. Using this amazing feature, one can easily create a virtual wireless adapter. Windows has the ability to turn your PC or laptop into a wireless hotspot enabling other devices to connect to it with much ease.
The virtual Wi-Fi adapter feature in Windows helps you to share your internet connection with other devices. Through this you can easily create a Wi-Fi hotspot while you’re connected to another Wi-Fi network, sharing one Wi-Fi connection over another device.
There are several ways to share your internet connection with other devices using a Wi-Fi hotspot. While running a wireless hosted network, you can connect to another Wi-Fi.
View Wi-Fi Password on Android and iOS Device – A Step-by-Step Tutorial
How To Turn Windows 10 PC Into WiFi Hotspot?
Here are the 5 simple ways that help you in creating a Wi-Fi hotspot in Windows 7/8/8.1/10 devices.
Check out the various methods and get connected to a secure Wi-Fi hotspot.
Take a look!
If you are looking to buy a router then here is our suggestions: Best Wi-Fi routers in India
Method 1: Create Wi-Fi Hotspot Using Command Prompt
Before heading to the actual process, you need to check whether your Wi-Fi Network card provides the ability to turn the Wi-Fi Hotspot on your Windows PC. Just check out and follow the simple real-time commands mentioned below:
- Run the command prompt as Administrator. For this, you need to press the ‘Windows key’ and ‘R’ buttons simultaneously. The Run windows will pop-up on the screen.

- Now, type ‘cmd’ in the field then hit ‘Ok’ or ‘Enter’. The command prompt window will then pop-up with administrative privileges.

- In the command prompt window, just type netsh wlan show drivers and press enter.
You can check it from the above image. - You can see in the output Hosted network supported: Yes which means that your computer or laptop supports hosted networks.
- This way you can check whether your machine supports turning on the Wi-Fi hotspot on your Windows device or not.
- Now, you need to set the SSID and Password to your Wi-Fi hotspot making use of the following commands.

- Type netsh wlan set hostednetwork mode=allow ssid=Hotspotname key=password in Command prompt. You can replace the ssid and the password as per your choice. This will create a Hotspot but it is currently offline.

- To start the hotspot, you need to just type netsh wlan start hostednetwork in the command prompt. Your Wi-Fi hotspot will be initialized and make sure that you have turned your Wi-Fi on your PC or laptop. Otherwise, the signals won’t get transmitted.
- In order to turn on Internet Connection Sharing on the network adaptor that has the access to the Internet, you need to follow the simple steps given below:
- Control Panel >> Network & Internet >> Network Connections.

- Go to Properties. Turn on the option “Allow other network users to connect through this computer’s Internet connection” under Sharing tab.

Note: Ensure that you choose the enabled Wireless virtual adapter for the Home networking connection.
- If you want to stop or turn off the Wi-Fi hotspot, you can just type netsh wlan stop hostednetwork in command prompt.
- Every time, to get connected to a Wi-Fi hotspot, you need not do the same. Just enter the single command, whenever you wish to switch on the Wi-Fi hotspot.
- netsh wlan start hostednetwork
- That’s it! This is one of the easiest methods to create a Wi-Fi hotspot on your Windows PC or laptop. You can now access your Wi-Fi hotspot on your mobile or any device.
Is your Wi-Fi is too bad. Then, here is a guide for you to improve Wi-Fi Singal strength on your Smartphone.
Method 2: Create Wi-Fi Hotspot Using Virtual Router
Windows has integrated multiple ways to create a Wi-Fi hotspot but, you can simply hop them as the open-source Virtual Router application on your Windows device will run better in utmost circumstances. In fact, it is an interface on top of prevailing features built into Windows.
Virtual Router creates a virtual Wi-Fi adapter that lets you get connected to a Wi-Fi network while hosting your own Wi-Fi network. You can do both simultaneously just by using a single Wi-Fi adapter, making this an exemplary way to share different Wi-Fi connections and some other Wi-Fi networks that have a single login to.
It provides an easy-to-use and setup interface which is actually found on the Windows 7 operating system. Windows 8 doesn’t provide any graphical interface for setting this up, so it’s indeed more critical there. Just follow the simple steps given below to create a Wi-Fi hotspot using a virtual router.
- Download Virtual Router on your Windows device and launch it.
- Provide a name for your network, enter the password, and select the connection you wish to share with devices that connect to that Wi-Fi network.

- Click the “Start Virtual Router” button, and you’re done.
- You can even see a list of connected devices in this window.
You need not explicitly spend any money on using Virtual Router and no advertisements will be displayed.
Method 3: Create Wi-Fi Hotspot in Windows 7 Using Adhoc Network
An AdHoc network is a local area network that can build spontaneously and it allows your computer and other devices to communicate directly with each other within a small range. The ability to create an ad-hoc network has been inbuilt into various platforms of Windows starting from Windows XP, 7, 8, and above. You can use this feature to share the internet connection with other wireless devices.
Here are the simple steps on how to use AdHoc network feature to create a Wi-Fi hotspot o your Windows device.
- Firstly, click on the Start and type ‘wireless’ into the Search box and select “Manage Wireless network”.

- Now, open the Manage Wireless Networks window and Click on the Add button to add a wireless network.

- Click “Create an AdHoc network.” You will then get a message directing you the type of Adhoc network. Simply click on ‘Next‘.

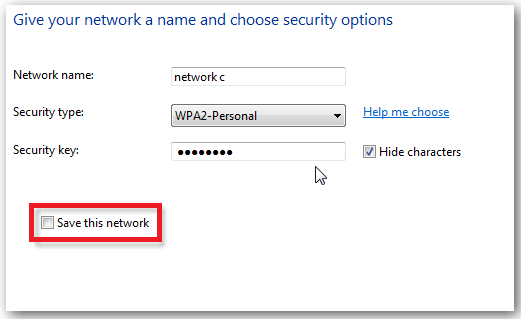
- Enter a network name and security key for the network and select the type of security from the list of wireless networks.
- Your PC or laptop will disconnect from its current Wi-Fi network so that your other devices can connect to an Adhoc network.
- Make sure that you activate the “Allow other network users to connect through this computer’s Internet connection” checkbox if you want to share an Internet connection with the devices connected to your device’s hotspot.
- Using these simple steps, you can create a Wi-Fi hotspot on your Windows 7 computer anywhere and share your internet connection with other Wi-Fi enabled devices.
Method 4: Create Wi-Fi Hotspot in Windows 8/8.1/10
The giant software firm, Microsoft has removed the graphical wizard that lets you create an Adhoc wireless network in Windows 8. However, this can be yet built into the Windows operating system, and you can set it up without the need for any third-party software.
Just follow the simple steps given below:
Step 1: Press the Windows + R key to open the Run dialog box. In the box, type ncpa.cpl and hit Ok or press enter.

Step 2: Open the network connections and right-click on your wireless network adapter and select properties from the context menu.

Step 3: In the pop-up window, tick the “Allow other network users to connect through this computer’s Internet connection” box. This is to enable the Internet Connection Sharing so that you can share another Internet connection with devices that connect to the wireless network.
Step 4: Now right-click in the bottom left of your screen to launch an administrative command prompt.

Step 5: In the command editing window, enter the following command:
netsh wlan set hostednetwork mode=allow ssid=”DellNet” key=”asdfg12345″

Step 6: Just hit enter and the system will create a Wi-Fi hotspot. You need to enter the following command to start the Wi-Fi connection.
- netsh wlan start hostednetwork

Method 5: Create Wi-Fi Hotspot on MAC OS
Even if you’re a Macintosh, you can function it as a wireless hotspot similar to Windows PCs allowing you to connect your other devices to Mac and share its internet connection. This is very beneficial and quite convenient if your Mac is connected to a wired network interface via Ethernet.
- The Wi-Fi hotspot option is a section of the “Internet Sharing” feature in Mac OS X. You can easily find it in the System Preferences window.

- Just click the Apple menu, select System Preferences, and click the Sharing icon.
- Choose the ‘Internet Sharing’ option from the list and select the Internet connection you wish to share with the devices.
- Simply follow the wizard to set up a Wi-Fi hotspot access point on any of your Mac devices like Mac computer, MacBook Pro, MacBook Air, MacBook, iMac, Mac mini, Mac Pro, etc.
Create Free Wi-Fi Hotspot Via Apps
Here are some apps that help you to create a free Wi-Fi hotspot to share your internet connection with other devices. Check out the apps to create your Wi-Fi hotspot.
Want to know the current Wi-Fi password on your PC, then here is the simple tutorial to know the current password on Windows 7/8/8.1/10 PC/Laptop
1. mHotspot
If you wish to connect multiple devices to a single wired Internet connection or want to share your Internet with other devices, you can use mHotspot that lets you turn your laptop into a Wi-Fi hotspot. You can connect a smartphone, tablet, iPad, or other Internet-accessible devices to it without having to blow money on the router or multiple Internet connections.
mHotspot is an app that supports the sharing of LAN, Ethernet, 3G/4G, Data-Card, or any other wired Internet connections on your PC or laptop. You can also use mHotspot to expand your Wi-Fi signals by connecting multiple devices. A virtual hotspot has the ability to turn any (wired or wireless) Internet connection on your laptop to a wireless access point without the need for a router.
Steps to Create Wi-Fi Hotspot using mHotspot
Follow the simple steps given below to connect multiple wireless devices to a single wired Internet connection without a wireless router.
- Initially, download and install mHotspot which is a free software program that is less than 1Mb helps to turn your laptop into a WiFi hotspot.
- Ahead of running the mHotspot, make sure you have connected to wired the Internet and turned on Wi-Fi on your PC or laptop.

- Assign a hotspot name, enter a password that must be a minimum of eight characters.
- Now, this is the crucial step where you need to select the Share From as wireless Internet connection that makes currently active connection shared through the virtual hotspot.
- You need to select the Clients by choosing the number of devices you wish to connect to the virtual hotspot.

- Run the mHotspot just by hitting the Start Hotspot button which will create a new virtual Wi-Fi hotspot connection and an access point for other wireless devices like smartphones, tablets, or iPads.
- Now, you can connect any wireless device to the newly created virtual hotspot which acts as an access point.
2. Connectify
If you want to set up a Wi-Fi router hotspot with bounteous wi-fi options and a pretty good interface, you can undoubtedly pick Connectify which is an amazing internet sharing application. It lets you create a hotspot from your internet connection with much ease.
Steps to Create Wi-Fi Hotspot Using Connectify
- Download and install the Connectify hotspot app on your device.
- Set up your Connectify app and start streaming your connection.
- You can now scan for WiFi networks from your devices and connect it to the hotspot.
- That’s it. You’re done!
3. Portable Wi-Fi Hotspot
These are the different ways to create a Wi-Fi hotspot on your Windows 7/8/8.1/10 devices. Hope this tutorial guides you in the best way to create a Wi-Fi hotspot on your Windows 7/8/8.1/10 devices.
I hope you all got the right answers here.
If you know any other methods to create Wi-Fi hotspot in Windows, let us know in your comments.
Enjoy browsing!


